Every kitchen remodel starts with the same handful of decisions: cabinets, countertops, backsplash. And somewhere near the bottom of the list, usually treated as an afterthought, is lighting. We see it happen all the time. A homeowner spends months agonizing over quartz vs. marble, then picks out a single flush-mount fixture and calls it a day. That’s a mistake that shows up the second you try to chop an onion at night or realize your beautiful island is covered in shadow.
The truth is, lighting is the difference between a kitchen that looks good in photos and one that actually works for the people living in it. We’ve been inside hundreds of kitchens across Los Angeles, from the old bungalows in Sherman Oaks to the sprawling remodels in Encino, and the ones that feel right aren’t the ones with the most expensive fixtures. They’re the ones where the light actually makes sense.
Key Takeaways
- Layer your lighting: ambient, task, and accent work together, not alone.
- Under-cabinet lighting is non-negotiable for serious cooks.
- Pendant placement over an island has a formula — ignore it at your own risk.
- Dimmers aren’t optional. They’re the cheapest upgrade you can make.
- Recessed lights are useful but overused. You need variety.
Table of Contents
Why Most Kitchen Lighting Fails
The biggest problem we see isn’t bad taste. It’s a lack of strategy. People pick one light source and expect it to do everything. A single overhead fixture might light the room, but it won’t light your work surfaces. You end up cooking in your own shadow. That’s not a design flaw — it’s a physics problem.
We worked with a client in Tarzana last year who had installed six recessed cans across her ceiling. She thought she was covered. But when she stood at the stove, her body blocked the only light hitting the burners. She had to turn on the hood light, which was barely functional. That’s the reality of relying on a one-size-fits-all approach.
Good kitchen lighting requires layers. You need ambient light to fill the room, task light where the work happens, and accent light to highlight features or create mood. Skip one of those layers and you’ll feel it every single day.
The Three Layers You Actually Need
Ambient Light: The Base Layer
Ambient lighting is the general illumination that lets you walk through the kitchen without bumping into things. It’s the foundation. In most remodels, this comes from recessed lights or a central ceiling fixture. But here’s the catch: ambient light should be soft and even, not harsh.
We recommend dimmable LED recessed lights spaced roughly four to six feet apart, depending on your ceiling height. In Encino, where many homes have eight-foot ceilings, closer spacing works better. If you have a vaulted ceiling, you can spread them out a bit more. The goal is to avoid pools of bright light surrounded by darkness.
Task Light: Where the Work Happens
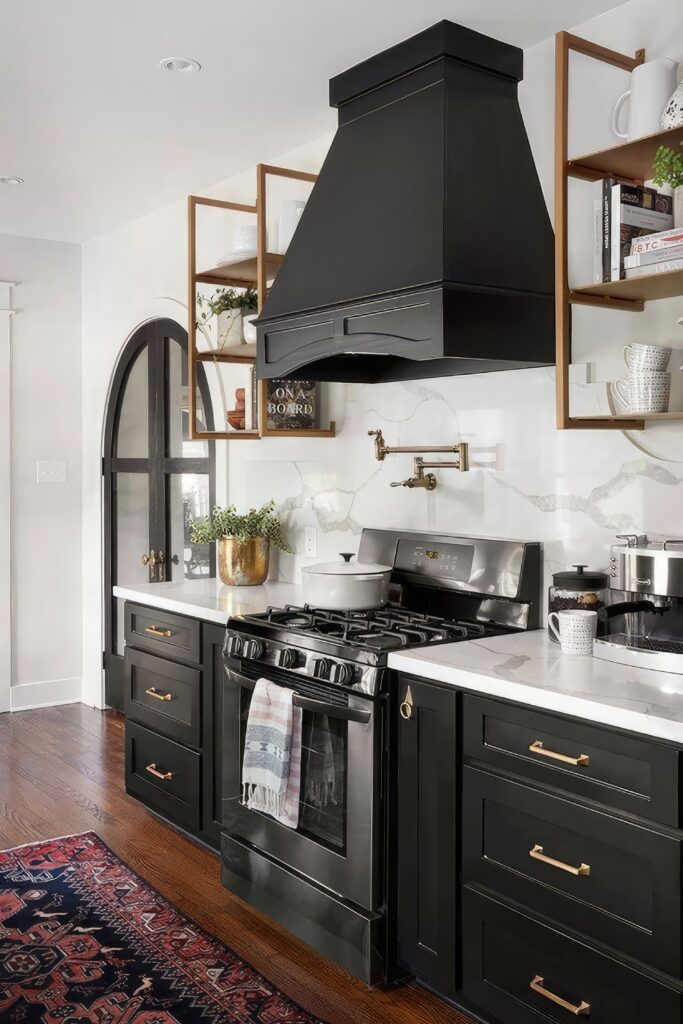
This is the layer most people neglect. Task lighting goes directly over your countertops, sink, and stove. Under-cabinet lighting is the most practical solution. We’ve installed everything from hardwired LED strips to plug-in puck lights, and honestly, the hardwired strips are worth the extra effort. They’re seamless, last longer, and don’t clutter your outlets.
If you’re doing a full remodel, run a dedicated circuit for under-cabinet lighting. It’s a small cost upfront that saves headaches later. And don’t forget the island. Pendants over an island aren’t just decorative — they’re task lights for chopping, mixing, and plating. We usually hang them 30 to 36 inches above the counter surface. Any higher and they lose function. Any lower and they block your view.
Accent Light: The Finishing Touch
Accent lighting is about depth and texture. It’s what makes a kitchen feel designed rather than assembled. Toe-kick lighting, glass-front cabinet lighting, or a strip above open shelving — these don’t need to be bright. They just need to exist. In a city like Los Angeles, where open-concept layouts are common, accent lighting helps define the kitchen zone without walls.
Pendant Lights Over an Island: The Rules We Swear By
Island pendants are probably the most debated topic in kitchen lighting. Everyone wants them, but they’re easy to get wrong. We’ve seen pendants hung too high, too low, too close together, or too far apart. The result is a kitchen that feels off-balance.
Here’s what we’ve landed on after years of trial and error:
- Number of pendants: For islands under six feet, two pendants. Over six feet, three. One pendant rarely works unless the island is very small.
- Spacing: Divide the island into thirds and place the pendants at the division points. That keeps them centered over the counter, not hanging over the edge.
- Size: The pendant should be about one-third the width of the island. Too small and they look like an afterthought. Too large and they dominate the room.
- Height: 30 to 36 inches from the countertop to the bottom of the fixture. If you’re tall, go closer to 36. If you’re shorter, 30.
A client in Woodland Hills insisted on hanging her pendants at 48 inches because she liked the “clean look.” She ended up lowering them after a month because the light never hit the counter. Trust the numbers.
Under-Cabinet Lighting: The Unsung Hero
If we could recommend one lighting upgrade that changes a kitchen more than anything else, it’s under-cabinet lighting. It’s not glamorous, but it’s transformative. Suddenly your countertops are usable. Your knife work gets safer. Your kitchen feels larger.
We prefer linear LED strips in a warm color temperature — around 2700K to 3000K. Cool white light (4000K and above) makes food look unappetizing and skin look gray. Warm light feels natural and inviting. In Los Angeles, where many kitchens open into living areas, matching the color temperature across zones is important. You don’t want a cool white kitchen next to a warm white living room.
For installation, run the wiring during the cabinet phase, before the backsplash goes in. That way the wires are hidden and the transformer is tucked away. If you’re remodeling an existing kitchen without new cabinets, plug-in puck lights are a decent alternative. They’re not as clean, but they work.
Recessed Lighting: Use It, Don’t Abuse It
Recessed lights are the default choice for ambient lighting, and for good reason. They’re unobtrusive, relatively cheap, and easy to install. But we see them overused constantly. A kitchen doesn’t need twelve recessed lights. It needs a thoughtful layout.
We usually place recessed lights around the perimeter of the room, not directly over the island or the main work zones. The perimeter lights bounce light off the cabinets and walls, creating a softer glow. Direct overhead lights create harsh shadows, especially when you’re standing at the counter.
One trick we use: install recessed lights on separate switches. Put the perimeter lights on one switch and the lights over the sink and stove on another. That way you can control the mood without flipping everything on at once.
Dimmer Switches Are Not Optional
This is a hill we’ll die on. Every light in your kitchen should be on a dimmer. Not most. Every single one. The ability to go from bright task lighting to a soft evening glow changes how the room feels. It’s the difference between a sterile workspace and a warm gathering place.
Dimmers are inexpensive. A quality dimmer switch costs about twenty dollars. Installation is straightforward if you’re comfortable with basic electrical work. If you’re not, hire an electrician. It’s a small investment that pays off every day.
We had a client in Encino who refused to put dimmers on her new pendants because she thought they’d flicker. That was a concern with older dimmers and certain LED bulbs, but modern dimmers are designed for LEDs. We installed them anyway, against her wishes, and she called us a week later to thank us. Sometimes you have to push.
Natural Light: The Best Light You Can’t Control
No fixture beats the sun. If your kitchen has windows, use them. But natural light comes with its own challenges. South-facing windows in Los Angeles can make a kitchen unbearably bright in the afternoon. West-facing windows create glare during dinner prep.
The solution isn’t to block the light — it’s to manage it. Sheer curtains, cellular shades, or window film can diffuse harsh sunlight without darkening the room. We’ve also seen homeowners install light shelves or reflective backsplashes to bounce natural light deeper into the space.
If you’re doing a major remodel, consider adding a skylight or a solar tube. They’re expensive, but they pay off in energy savings and daily comfort. In a city like Los Angeles, where we get over 280 sunny days a year, it’s a waste not to take advantage.
Common Mistakes We See in the Field
After enough remodels, you start to notice patterns. Here are the lighting mistakes we see most often:
- One light source for the whole kitchen. It never works. You need layers.
- Pendants that are too small. They look like jewelry, not fixtures. Go bigger than you think.
- Recessed lights in a grid. Ceilings aren’t chessboards. Place them where they’re needed.
- Ignoring color temperature. Mixing warm and cool light looks sloppy. Pick one and stick with it.
- Forgetting about the sink. The sink needs its own light, usually from a pendant or a recessed can placed directly above.
We’ve made all of these mistakes ourselves. The key is learning from them before the drywall goes up.
When to Call a Professional
Some lighting work is DIY-friendly. Swapping a fixture or installing a dimmer is manageable for a handy homeowner. But running new wiring, adding circuits, or installing recessed lights in a finished ceiling is best left to a licensed electrician. The risk of fire, shock, or code violation isn’t worth saving a few hundred dollars.
In Los Angeles, electrical work requires permits for most modifications. Unpermitted work can cause problems when you sell the house. We’ve seen it happen. A homeowner saved two thousand dollars on a DIY lighting job, then spent five thousand fixing it for the buyer’s inspection.
If you’re planning a full kitchen remodel, work with a contractor who understands lighting design. At Royal Home Remodeling located in Los Angeles, CA, we’ve handled enough kitchens to know where the light should go and where it shouldn’t. It’s not just about what looks good — it’s about what works when you’re actually using the space.
A Practical Comparison of Light Fixture Options
| Fixture Type | Best Use | Common Mistakes | Cost Range |
|---|---|---|---|
| Recessed LED | Ambient, perimeter | Overuse, wrong spacing | $50–$150 per fixture installed |
| Pendant | Task over island | Wrong height, too small | $150–$600 per fixture |
| Under-cabinet strip | Task for counters | Wrong color temp, hardwired vs. plug-in | $100–$300 per run |
| Track lighting | Flexible accent | Dated look, poor placement | $200–$500 per track |
| Chandelier | Statement piece | Too large or small for room | $300–$1,500 |
This isn’t a shopping list. It’s a decision guide. Every kitchen is different, and what works in a 1920s Spanish bungalow won’t work in a modern open-plan house. The table above reflects what we’ve seen hold up over time.
The Bottom Line on Kitchen Lighting
Lighting isn’t the most exciting part of a kitchen remodel. It doesn’t have the visual impact of a marble slab or the tactile satisfaction of soft-close drawers. But it’s the thing that makes everything else work. A beautiful kitchen with bad lighting is a disappointment. A modest kitchen with great lighting feels like a luxury.
Start with the layers. Plan for task lighting first, then ambient, then accent. Use dimmers everywhere. Pick a color temperature and stay consistent. Don’t let the fixture selection drive the design — let the light needs drive it.
And if you’re in the Los Angeles area, dealing with an older home’s quirks or a new build’s blank slate, take the time to get the lighting right. It’s the one part of the remodel you’ll interact with every single day, multiple times a day. Make it count.
Related Articles
Home Additions in Woodland Hills, Los Angeles, CA
Kitchen Remodeling in Sherman Oaks
Granite Vs. Quartz Countertops: Which Is Best For Los Angeles Kitchens?
Kitchen Island Designs For Entertaining In Large Woodland Hills Homes
Top 10 Home Addition Ideas for Growing Families in Porter Ranch (2026 Guide)
People Also Ask
The current trend for kitchen lighting focuses on layered illumination, combining ambient, task, and accent lighting for both functionality and style. Homeowners are favoring large, oversized pendants over kitchen islands and linear suspension lights for a dramatic focal point. Under-cabinet LED strip lighting remains popular for task visibility, while integrated toe-kick lighting adds a modern, floating effect. Smart lighting systems with dimmable, color-temperature adjustable LEDs are also in high demand, allowing for customizable ambiance. For a seamless look, many opt for recessed lighting with adjustable trims. At Royal Home Remodeling, we recommend using warm-toned fixtures to create a welcoming atmosphere, ensuring the kitchen feels both contemporary and comfortable.
For homeowners in the Van Nuys area looking ahead to 2026, the major trend in kitchen lighting is the move toward layered, task-specific illumination. Recessed LED lighting remains a standard, but it is now being paired with dramatic, sculptural pendant lights over islands. Under-cabinet lighting is no longer optional; it is essential for both function and ambiance, with linear LED strips providing a clean, shadow-free workspace. Smart lighting systems that allow for color temperature tuning are also gaining popularity, letting you switch from cool, bright light for cooking to warm, soft light for dining. At Royal Home Remodeling, we see these trends as a way to combine modern technology with timeless design, ensuring your kitchen is both beautiful and highly functional for years to come.
For your 2026 renovation in the Van Nuys area, avoid the trend of all-over cool white LED lighting, which creates a harsh, clinical look. Instead, choose warm dimmable LEDs that shift from bright to soft amber tones, creating a more inviting atmosphere. Also skip the outdated "can light grid" in every ceiling; a better approach is to use layered lighting with decorative pendants, wall sconces, and under-cabinet strips. Finally, avoid oversized, single-source fixtures that cast uneven shadows. Royal Home Remodeling recommends focusing on task-specific lighting and smart controls to tailor brightness by room function. This approach ensures your home feels modern, comfortable, and functional without falling for short-lived fads.
Several factors can make a kitchen look outdated. Outdated cabinetry is a primary culprit, especially if it features dark, heavy wood finishes or dated hardware. Old, worn countertops like laminate or tile can also age a space significantly. Appliances in harvest gold, avocado, or almond colors are a clear sign of a bygone era. Additionally, poor lighting, such as a single ceiling fixture, and the absence of modern backsplashes contribute to an outdated feel. For homeowners in the Van Nuys area looking to modernize, a full kitchen renovation can address these issues. Royal Home Remodeling recommends focusing on clean lines, neutral palettes, and contemporary fixtures to achieve a timeless look.
For kitchen lighting ideas, focus on layering three types: ambient, task, and accent. Ambient lighting, like recessed or flush-mount ceiling fixtures, provides overall illumination. Task lighting is crucial under cabinets for food prep, using LED strip lights or puck lights. Accent lighting can highlight a backsplash or open shelving with small spotlights or toe-kick lighting. Pendant lights over an island or breakfast bar add style and focused light. Consider dimmable fixtures for flexibility. For visual inspiration, browse home improvement websites or design magazines for pictures of these setups. At Royal Home Remodeling, we recommend choosing fixtures that match your kitchen's layout and your personal style for a balanced, functional space.
For a kitchen remodel in Van Nuys, CA, proper lighting is essential for both function and style. A layered approach is best, combining ambient, task, and accent lighting. Recessed lights provide general illumination, while pendant lights over an island offer focused task lighting and a design focal point. Under-cabinet LED strips are critical for illuminating countertops, reducing shadows during food prep. For a modern look, consider linear suspension lights. When selecting fixtures, ensure they complement your countertop material. For more on selecting surfaces, our internal article titled Granite Vs. Quartz Countertops: Which Is Best For Los Angeles Kitchens? provides excellent guidance. Royal Home Remodeling recommends dimmable switches for all circuits to adjust the mood from bright cooking sessions to soft evening ambiance.
For a functional kitchen lighting layout, you should implement a layered approach combining ambient, task, and accent lighting. Ambient lighting, often from recessed cans or a central fixture, provides general illumination. Task lighting is critical under cabinets for countertop work and above the sink or island. Accent lighting can highlight architectural features or backsplashes. A common guideline is to space recessed lights about 4 to 5 feet apart, but this depends on your ceiling height and fixture wattage. For large entertaining spaces, such as those in Woodland Hills, a well-planned island lighting design is essential. You can learn more about this specific application by reading our internal article titled Kitchen Island Designs For Entertaining In Large Woodland Hills Homes. Royal Home Remodeling recommends consulting a professional electrician to ensure your layout meets code and your specific needs.